Showing posts with label Tips And Tricks. Show all posts

Monday, 25 May 2020

Facebook Messenger App Tricks Along With Q&A | TechieHandBook

Facebook Messenger App : One of the top-rated messaging app in the current trend. I hope there is no one who doesn't know about Facebook or Facebook messenger. However, there may be few people who have certain queries related to this application.

Facebook Messenger App


People usually have queries like :

  • I'm installing and uninstalling my Facebook Messenger App again and again is that harm to phone?
  • If I reply to anyone in Facebook Messenger App will he be able to check my Facebook Profile?
  • How to Download Facebook Messenger For PC Latest version?
  • What Is Facebook Messenger Lite?
  • Facebook And Messenger Floating Mode Can be Enabled In Realme 3 Pro? 
These are the few major questions which many of us may be having currently. Today, we are going to share the solutions to the above-listed question. I'd suggest you to please go through the complete article to get clear answers.

Facebook Messenger App Tricks Along With Q&A

People having a concern that repeated installing and uninstalling Facebook Messenger will harm their phone or not?

I just wanted to let you know, if any app gets crashed most of the resources recommend to uninstall and then reinstall the app. As the app occupies space and nothing than that. So, you can install and uninstall the apps as per your wish.

Another query is that If we reply to a stranger in Facebook messenger will he able to check our profile? If you need a direct answer then it is No as the stranger has limited access. But what all he can do only if you reply to the stranger is, he can see your active status, he will come to know when you've read the messages and also he can give you a call using the messenger calling feature.

If you want to avoid these things happen then select ignore when you receive a message from a stranger.

Many people wanted to know whether we can download Messenger App for PC or not. Yes! we can download the Messenger app for PC. Here are the steps:


Please follow the steps to get Messenger for Windows Desktop:

Go to the Windows App Store.
Click Get the app. you'll be able to install in your machine.

On the other hand if you want to get the Messenger for Mac iOS Desktop:
Go to the Apple App Store.
Click Get. The app will be successfully installed in your machine and you can log in with your FB credentials

Note: Messenger for Windows requires Windows 10 OS.

Facebook messenger lite as the name defines it is the lighter version of the Messenger app. Lite has almost all the features of the messenger. It binds with three major action items Home, Contacts, and Profiles whereas the normal messenger app has many action items that we can consider as the major difference between Messenger App and Messenger Lite App.

Using messenger lite we can do an Audio or video call. When we are in an audio call we can simply switch to video call too.


Facebook or messenger app floating mode can be enabled by navigating to Settings > Smart & Convenient > Full-Screen Multitasking and toggle the slider to green.

Note: When your phone is set to block notifications then you won't be able to see pop up from a quick app.

If your phone doesn't block notification and you get a message from a quick app you receive a banner notification and where you can see Reply in Floating to start a floating window.

Friday, 22 May 2020

WhatsApp QR Code Scanner Update - Scan And Share Your Phone Number

WhatsApp QR Code Scanner : New update for WhatsApp beta version users has been released. WhatsApp beta users are the users who installed and accept the terms of WhatsApp beta updates. So whenever WhatsApp wants to release any new update they will test on beta users and if that works fine then they will release to the other users.


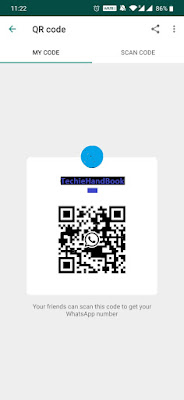
Recently WhatsApp released a new update about sharing the phone number using the QR code. Yes! WhatsApp QR Code helps in sharing your phone number. Your friend just needs to scan your WhatsApp QR Code to get your phone number.

WhatsApp QR Code Scanner


WhatsApp QR Code Scanner Update :


WhatsApp QR Code for phone number sharing is different from the WhatsApp web. WhatsApp web is a webpage where you can your WhatsApp on a desktop or on a laptop.

Steps On How To Use WhatsApp Web


Step1: Click on the link: https://web.whatsapp.com/ and you'll be able to see the below image

WhatsApp Web


Step2: Open your WhatsApp application in your mobile phone and navigate to Menu > WhatsApp Web.

A scanner will be automatically opened and you just need to scan the QR code which was displayed on the laptop in order to sync the WhatsApp and you'll be able to use the WhatsApp 

Note: Your mobile phone should be connected to the Internet then only you'll be able to use WhatsApp web

Steps On Sharing Your Phone Number Using WhatsApp QR Code

There are two ways you can open QR code. 

Step1: Open your WhatsApp application in your mobile and tap on Menu(three dots on right)


Step2: Tap on the settings you'll be able to see your name and about and then right side you can see a small icon as QR code tap on that


Step3: Now you can see QR code and Scan code two options. QR code is the code that your friend need to scan from his mobile to get your phone number and Scan Code is the option that is used to scan the QR code if you want to get the WhatsApp phone number.


The other way is that you can simply tap on the Message option at the bottom right to open your contacts list in that besides New Contact option you can see the code which helps you with the same screen of QR Code and Scan Code.

The above are the two best options to use WhatsApp QR Code Scanner to get the phone number by scanning the code and also sharing your contact too.

Apart from this WhatsApp also increased the Group call limit from 4 to 8 now. You can simply add your 8 friends to audio or video conference including you.
 
There is a way where WhatsApp gave a feature to restrict people adding to WhatsApp groups, which many of us don't like.

To know more details about Whatsapp please visit Wikipedia.

Hope the above-shared steps and information helps you in understanding the WhatsApp QR Code Scanner and also how to use the QR Code Scanner to share the phone number and also to use the WhatsApp Web

Sunday, 26 April 2020

Image Preview Windows 10 - Steps With Images

Image Preview : Many of us may face this issue that whenever we open our images folder in our Laptop/System we won't be able to see the preview of the image. In order to see the image we always need to open the file and then we will be able to see it.


There is a an option that will be help you to preview the image before opening the image file. Some of may be thinking that selecting a preview pane will help that but even if you select the preview pane the feature won't work. Below is the image for your reference.

Image Preview With Out Settings Enabled:

preview
From the above image you may understand that even Image Preview pane will not help in this scenario. Don't worry, we will help you in this.

Image Preview Windows 10 - Steps With Images

Image Preview

As shown in the above image that all the image thumbnails are showing hills with a moon. In order to get the preview of the image we also selected the preview pane but still unable to view the image. No worries, we are here to help you.

Please follow the below set of steps that will help you to enable the preview of the images which were stored in your laptop/desktop folders.

Image Preview Windows 10 

  1. Navigate to your folder of images which were stored in your laptop/desktop. Just like the image shown below
    Screenshot preview
  2. Once you open the folder then click on View tab as shown in the below image
    Screenshot preview1
     
  3. Once you click on the View tab you'll be able to see multiple options and the last option is "OPTIONS" just click on that and then there be a sub menu option "Change Folder And Search Options" need to click on that as shown in the below image
    Screenshot preview2
  4. Once you click on the "Change Folder And Search Options" you'll be able to see a pop up window with multiple options
    Screenshot preview3
  5. From the top three menus "General" 'View" And "Search" click on the tab "View" as shown in the below image.
    Screenshot preview4
  6. Once you click on the View tab the first option in the Advance setting section which says "Always Show icons, never thumbnails" need to uncheck and then hit on Apply button at the bottom right as shown in the image below
    Screenshot preview6
  7. Once you hit on the Apply button after you uncheck the "Always Show icons, never thumbnails" option you'll be able to see the preview.
    Screenshot preview7

Hope the above steps helped you to understand clearly on how to enable the Image preview on Windows 10 easily. Please stay connected to this blog for more latest tips and tricks, apps updates, Gadget releases, and also technology related news.

Friday, 24 April 2020

How to Reduce ping in PUBG?

PUBG - PlayerUnknown's Battlegrounds, a name that does not require an introduction and doesn’t need a description. PUBG is the subsequent top of the line game with 24 million copies and 4.3/5  Audience review ratings. The gamers were mesmerized with the “Battle Royal” concept and addicted for the TDM (Team Deathmatch) mode where the players will get a match with the other others who cannot play up to their levels. According to PUBG, the M79 grenade launcher is the most popular weapon in Payload mode.

How to Reduce Ping In PUBG ?


What is Ping In PUBG?

Ping refers to the network latency between a player's device and the game server. If you click on any button in an online game, the action will go from the game to the game server and back to your game. The entire time takes in this travel is called Ping and it will be in milliseconds nevertheless the network speed is low. 

If the Ping is less than 50ms then it is really good, if the ping is less than or equal to 100ms, then it is good to average. If the ping exceeds 150ms, then the gamers will experience a lag. If the ping reached to 200ms, it is better to leave the game.


The main cause of the high ping in PUBG is slow internet connectivity or internet not connecting Completly, Data consuming by others, or by other applications. But don’t worry, there are few tips that help you in reduce ping in PUBG.

Stop the second SIM To Reduce Ping In PUBG:

Yes, if you are using a dual SIM phone, close the other SIM from which you are Internet is not connected. Due to this, the load on your processor decreases and boosts the network connectivity strength of your single SIM and you can experience the reduced ping in the game.

Stop Background Syncing App:

To get the lower ping in the game, manually stop the background Syncing Apps. In the Android device, you can perform the action from the Settings and then navigate to Apps. Select the skeptical app and click on Restrict Data Usage.

Clear cache memory:

Apps will occupy large space by creating GBs of cache memory which further results in the lag in the game. So, Simply go to settings and then navigate to Apps. Select the skeptical app and Clear cache memory. This will help in clearing some space in your smartphone and you can experience the smooth gameplay
.
PING an ISP:

Try to change the ISP from the Start menu on your PC. Click on Start and then Run the CMD and press enter. Now in the Command Prompt window, type "ping" <space> your Internet Service Provider's domain name or IP address without the "https://" prefix and click on Enter. Here, you will find a summary that displays the number of packets sent, the number of packets received back, and those lost during the test.


WiFi Settings:

If you are playing the PUBG game on WiFi. Click on WiFi advanced or Additional settings from the phone settings and change the traffic mode to "Extreme Mode". 

For more tips to Boost your WiFi and Reduce the Ping in your PUBG game, read the below article which helps you get the high WiFi Speed. 

Tips to boost your WiFi Speed

Few more Tips helps Reduce Ping in PUBG game
  • Remove all the other Devices from your Network.
  • Come closer to the WiFi Router or Mobile Hotspot etc
  • Repair PUBG from the Repair button
  • Use Native game boosters (Available for Mi and One plus from the Gaming Mode settings)
  • Use Wi-Fi rather than mobile Data and put your phone in Airplane Mode

Note: Do not use tools like GFX Tool, BAGT, PUB GFX TOOL which may lead to Ban your account for the offense of cheating.


Hope the above shared steps help you Reduce Ping in PUBG and experience the smooth gameplay.
Please stay connected to this blog for more latest updates on the apps, Gadget releases, Technology related news, and tech tricks.

Thursday, 23 April 2020

WhatsApp Group - How To Create & Restrict Others Invites ?

WhatsApp Group : WhatsApp is one of the best messaging app. There may be multiple apps like Hike, Telegram etc but most of the people attached to this application.

There are multiple reasons why people use this app but mostly because it is user friendly, simple and can be used in multiple kind of file sharing and also audio and video calls.


Today we are going to share few tricks about WhatsApp Group. Yes! many of us know that we can create a group in WhatsApp and add our friends to that particular group. But, how many of us know that we can restrict on who all can invite us for their groups. Yes! most of us don't want to get into the groups of the people whom we don't like. So there is an option where we can restrict those contacts.


Along with that we can also add people by sending the invite link. How many of us know that how to create WhatsApp Group invite link? So, to all those people we are going to share those details along with the screeshots. I'd suggest you people please go through the complete article to know the WhatsApp Group feature in detail.


WhatsApp Group - How To Create & Restrict Others Invites ?

WhatsApp Group

Before we start with the featurses, the first question many of us have that how many contacts can be added to the WhatsApp Group ? Earlier it was 100 but now it was increased to 256. So you can add a very good number of contacts to your groups and we think it is more that enough for any school, college friend groups.

WhatsApp Group

So, let us start with WhatsApp Group creation and then followed with on how to restrict someone adding to their groups. If you people already aware of WhatsApp Group creation please jump to WhatsApp Group Restrict section.

How To Create WhatsApp Group And Send Whats App Group Link:

Please follow the steps in the below on how to create a Whatsapp Group along with that we also shared information about How To create whatsApp Group invite link ?

  1. Firstly we need to open the app and one you are in the Chats Tab, tap on the top right three dots you'll be able to see a couple of options in that first option is new group tap on that and you'll be able to see your contacts and select the contact you want to add to your group and hit the arrow "->" at the bottom to continue.
    WhatsApp Settings
  2. Once you select the contact you need to give the Group name and hit the tick.
    WhatsApp navigation
  3. Once you hit the tick you'll be able  to see the Group created successfully with the Group name on the top with the participants on top.
    WhatsApp group chat
  4. Once you tap on the Group name on top you can see the option that are available linked with the Group. You can see two options one if like Add participants and the other is Invite Via Link.
    Group Edit
  5. Once you tap in Invite Via Link you can see multiple options that will help you to share the link either via WhatsApp or copy the link and share it via other messaging apps or else you have an option to share via the apps which were pre installed in your mobile.
    WhatsApp Group Invite
Hope the above images helped you on how to create WhatsApp Group and also on How to create a Group Invite link and how to send it.

WhatsApp Group Restrict - How To Restrict Someone To Add Me In Their WhatsApp Groups


  1. Open the WhatsApp application and tap on chats tab and then tap on three dots on top right and tap on Settings options.
    Settings
  2. Once you tap on the settings you'll be able to see multiple options in that tap on the first option Account
    WhatsApp Account Settings
  3. Once you tap on the account you'll be able to see the option Privacy tap on that
    WhatsApp Privacy Settings
  4. Once you tap on that Privacy you'll be able to see a multiple option in that list once you scroll down you can see Groups tap on that
    WhatsApp Group Navigation
  5. Once you tap on that Groups you'll be able to see 3 different option who can add you in their Groups. Every One, My Contacts , My Contacts Except
    WhatsApp Group Settings Navigation
If we select everyone who ever has your number can add to their groups, My Contacts means all the contacts which were saved in your Whatsapp contacts can add to their groups. My Contacts Except is the option where you can specifically select the people from whom you don't want to get added to their Whatsapp groups until you accept it.


Hope the above shared information helped on how to create Whatsapp group and also about how to create Whatsapp group invite link. You may also get to know now on how to restrict someone in adding to their groups

Stay connected to this blog for more latest update on the Apps, Gadget releases, Tech tricks and also technology related news.

Saturday, 18 April 2020

Videocalling Apps List With Tips And Tricks - Latest Features

Videocalling Apps List : Video Calling is one of the most preferred ways of communication for Team meetings, Job Interviews, Group callings, etc. There are multiple mobile and web applications available in app stores from which Hangouts meet, Zoom.us, Skype, WhatsApp, and Facetime are the most popular apps preferred by a large number of users. These are the most used Videocalling Apps 

Videocalling Apps List With Tips And Tricks - Latest Features


Videocalling Apps List


Most of the Companies use Zoom.Us, Google Hangouts meet to host Virtual meetings and conferences. Users can schedule, record and save the meetings in Zoom, Skype and Google Hangouts meet while users have to download a third-party app to record whats app Video calls and Google duo calls which is not recommended. Google Hangouts meet will support 100 participants to join the meetings at once whereas skype allows 10 Participants followed by 4 and 8 for Whatsapp and Google duo respectively. 


In this article, we are going to share Videocalling Apps List along with that we also help you with the video chat tricks that help everyone one or the other time.


There are multiple feature which most of us ignore while we do a video call. So please go through the complete article to know mainly about Videocalling Apps List and its features

Videocalling Apps List 


Here we share about the best video chat app along with features. Where you can use the new background, share screen, display the participants in gallery view etc. The Videocalling Apps List which was shared below are free video chat apps. We can use with out paying anything.

Add New Background: For Maximum of us, the background would be the major problem and it is equally important to stay professional with good surroundings. Therefore to maintain a good background by removing unnecessary mess behind you there are features to remove the background and add the new background

  • Zoom meeting:
    • Simply go to settings in Zoom App and there you will find an option called ‘Virtual Background’.
    • Upload a photo of your choice to make it as your Video Chat Background. 
  • Skype:

    • To Blur your Background, Click on the Video button during a call and there will appear a pop-up, toggle the "Blur my background" option and Skype will automatically adjust a focus on you and blurs the background.
    • To add an image, Click on Personalize option from the settings menu and change the wallpaper of your choice.

  • Hangouts meet there is no built-in option to blur or obscure Background and for this, we need to use the browser Developer tools to edit the source code or you can use ChromaCam desktop application. ChromaCam application will remove, Blur or replace your background in the Video call apps like Hangouts, Skype and Zoom, etc.

Creating a Poll: Creating a poll is a great choice as it will allow the participants to respond with minimal efforts. Participants can share their feedback by simply clicking on an option given in the poll. When we are in a video chat with a group of people, it is difficult to get the opinion/feedback from each individual as it will take a lot of time depending on the number of participants. Therefore, Video Chat apps like Zoom, Skype etc.


  • Zoom: From the meeting, the Management page, find the poll option and click on Add to begin creating a poll.

  • Skype: In the Skype Window, Click the present Icon to select more and Navigate to the option Poll to create the Poll

Share Screen: Sharing your presentation screen on a video call is a viable method to bring up one thing to every one of your pals. With the Screen sharing feature, the participants can take control of the meeting and display their screen.

  • Zoom: Click on the Share Screen button on the Zoom window and select the screen you want to share.
  • Hangouts Meet: Click on the Present button on the meet window, you will get two options to share the “Entire screen” and “Application”. You have to select one option based on your requirements. 


Display Participants in Gallery View: Usually in every Video chat, we can able to see the active speaker view and the other speakers display toward one side of the screen. Therefore, Video Chat apps like Zoom, Hangouts Meet, and Skype offer Gallery View option which allows you to view the participants in a Grid pattern.
  • Zoom: Navigate to the top right corner of the Zoom window and click on Gallery view to switch from Active speakers view. Zoom allows displaying 9 participants in the Gallery View.
  • Hangouts meet: Navigate to the Lower right corner of the Hangouts meet window and change the view by clicking the changing layout.
  • Skype: Click the switch view button and select the GridView.
Hope the above shared features of the best videocalling app helped you to understand the features and usage of the application. Please stay connected to this blog for more latest updates on the apps, Gadget releases, Technology related news and tech tricks.

Monday, 13 April 2020

How To Download YouTube Videos - Complete Guide

How To Download YouTube Videos: Now a days everyone is interested in video content. People want to share the videos to their beloved ones. Sharing a the video link and ask the other person to watch is some what annoying.

While watching any WhatsApp status videos we wanted to download them and add them in our whatsapp status. If we add the link of the video, most of the people will just ignore.

People who still don't know the best possible ways to download the YouTube videos this article if for them.


We are going to share two popular websites which will help you in downloading the videos and one app. Please go through the complete article to know more details of the website along with the links and also steps on how to download the app and install in your smartphones.

How To Download YouTube Videos - Complete Guide

As we mention earlier that there is an app also to download video from different platforms, not only from YouTube but also in other social media applications too. 


How To Download YouTube Videos


How To Download YouTube Videos Using An App ?

Most of the people looking for an app to download the YouTube videos quickly. The interesting feature of this application is you can also download Mp3 of your most like YouTube video.

InsTube :

The app which we are referring to is InsTube. People should aware that this application won't be available in the play stores. There is a website of this app from where you can download the application. Below is the website link.

InsTube Website Linkhttps://instube.com/


How To Install InsTube In Your Smartphone ?

Step1 : You need to visit the website and hit on Download option 

Step2 : A page will be opened and your file will be downloaded in the mean time there will be an instructions will be shown that you need to allow one setting in your smartphone.


Navigate to Settings and Then Security and Toggle on the Unknown Resources that mean you need to allow your smartphone to download the files and work in your phone. Here is the link to know in detail with images

Step 3: Once you done with download, you can install the application and use it.

How To Download YouTube Videos Using InsTube ?

The InsTube team has a given a complete step by step user manual guide for the people who wants to now the steps along with the Images that makes more easy for users to use the applications.

Download videos Using InsTube : Manual Guide

As mentioned InsTube not only used to download video from YouTube there are other applications as well from where this application is able to download the video. Please refer the image that give you an idea.

InsTube Support Websites


Hope you have complete information about the App on how to download the YouTube videos using the above InsTube app. Now will check with the two website which will also help us in downloading the videos from YouTube


Y2mate.com

The first website in the list of  how to download YouTube videos using any websites is Y2mate. please follow the below steps on how to download video using this website.

Step1 : Open your tube and search for the video your want to download 

Step2 : Once you open the video which you want to download, now copy the URL in the address bar

Step 3: Open the Y2mate website here is the link

Step4 : You'll be able to see a text box where you need to paste the link and hit start

Step5 : After some time scroll bit down you'll be able to see Video , Mp3 and Audio categories. In video category you can see full HD, 480px, 360px, etc resolution videos as per your need click on download and a pop up window will be displayed after that you'll get option to Download Mp4 click on that and your video will be downloaded.

Key Features of the Y2mate website is :

• You can simply download video without any limit and best part is no need to pay for that.

• The converted for downloading the video is very high

• Website won't ask for any kind of signup registration process

• Major feature is this website support all format downloads.

Savefrom.net

Another website in the list of youtube video downloading is savefrom.net . Pleas follow the below steps to download the videos

Step1 : Open Youtube just like in the earlier step and copy the URL of the video you wanted to download

Step2 : Open the Savefrom.net website here is the link

Step3 : Paste the link you copied and hit Download button. It will give options on which format you wanted to download the video. Hit on that and download the video.


In the website itself you can see a " How to download?  " option once you click on that a video will be played which shows on how to download YouTube videos using savefrom.net


Hope the above steps helped you on how to download YouTube videos for laptop and also how to download YouTube video in mobile phones. Stay tuned this blog for more latest updates on the apps, tech tricks, technology related news and also latest gadget releases updates.

Saturday, 4 April 2020

How To Install Windows10 Using USB Flash Drive - Updated 2020

How To Install Windows10: If you are looking for simple steps on How To Install Windows10 in your laptops or desktops you reached the correct article.

We are going to share the precise details on what are the laptop/desktop requirements to install the windows10 OS and also will help you with the step by step process on how to download the ISO file from the Microsoft website and also how to use USB flash drive to install windows 10 in your system.

I'd suggest you to please go through the complete article to know detailed instructions on how to download and How To Install Windows10 OS. In the below article you can find how to install windows10 step by step process. So, please go through the complete article

How To Install Windows10 Using USB Flash Drive - Updated 2020

How To Install Windows10

Before we jump in to direct windows 10 installation steps, there are certain requirements that need to be arranged before we start working on installing the Windows10 in your machines. Today we are helping you with steps on how to install windows10 from USB. So please follow the step by step instruction to understand what are the requirements


The major requirements are listed below:
  • Windows10 ISO File - This need to be download from Microsoft website
  • Rufus Application - This will help in installing ISO file to USB Flash drive
  • Laptop/Desktop with certain specification which were listed below
  • USB - In which we are going to install ISO file using Rufus application
Let's start with downloading the Windows10 ISO file from the Microsoft official website.

Step 1: Click on the link and then click on the Download Tool Now. Here is the screenshot for your reference
Windows10 ISO Download

Step 2: Once you click on that Download Tool Now button, Media creation tool with some version will be downloaded. You just need to install that tool and open it.

There will be a couple of instruction which is easy to understand and follow to complete the process.
  • Read through the license terms and then accept them with the Accept button.
  • Choose Create installation media (USB flash drive, DVD, or ISO file) for another PC and then select Next.
  • Choose the Language, Edition, and Architecture you want the ISO image for. It will be good if you select both at the time of Architecture of Windows10 ISO file selection as you can use 32-bit or 64 bit as per your requirement later.

Step 3: Here you will be seeing an option to download file for USB Flash Drive or ISO file. As we are looking for ISO I'd suggest select ISO file and click next and then select the folder where you want to download the ISO file.

Till now we downloaded the ISO file. Now lets move to USB flash drive where we need to copy this ISO file to USB for this a third party application which is Rufus needed.

Step 1: Just click on this https://rufus.ie/ and download the latest version of Rufus in your system.

Step 2: Once you install please insert USB to your laptop/system and open the Rufus application you will be able to see a window just like below
USB Flash Drive Using Rufus

where at top the Device should be listed your USB device name and under Boot selection please select ISO file which we downloaded earlier and don't make any other changes and hit START button and it will take few moments to copy the ISO file.


There will be a pop sometime before copying that USB will be formatted. Select okay for that and format the USB before you copy the ISO. Once it gets completed you can see the status bar and you can eject the USB.

Now we have successfully complete the downloading the copying the Windows10 ISO file in USB Flash drive. We need to install the same in our machines. For that below are the system requirements

CPU: 1GHz or faster supported processor
RAM: 1GB for Windows 10 32-bit or 2GB for Windows 10 64-bit
Storage: 32GB of space or more

Once our system or laptop is available and meets the above requirements please follow the below steps to know about how to install windows10 in laptop


Step 1: Connect USB to your system and then Please access your computer's BIOS or UEFI by holding a specific key during the boot process the keys may be Escape, F1, F2, F12, or Delete. 

So, you need to figure out which key your computer uses or else you can browse the internet and get to know which key for your brand system/latop. After that shutdown and try to press that particular key.

Step  2: Once you are able to open the Boot options you need to find the setting for boot order it can be in a section called "Boot" or "Boot order."

The order helps you to understand from where system loading the operating system. In that order you need to keep your USB device at first so that system will load the OS from the USB Flash drive first.

You'll be able to see the option below on how to move the USB Flash drive on top and also you need to disable Secure Boot if  your system enables it already. 


Once everything is on place save the changes and reload the system then it will enter into Windows10 installation setup. Where you can select the drive/format the drive in which you want to install the windows 10 OS and then click on Install Now button and follow the onscreen instructions that will help you in complete installation of Windows10. Hope the article helped on How To Install Windows10. 

Please stay connected to this blog for more update on the technology tips and tricks, latest gadget releases, app released, technology news.

Monday, 30 March 2020

How To Boost Your WiFi- Tips To Boost Your Home WiFi speed

How To Boost Your WiFi: The lockdown due to the coronavirus breakdown has constrained a large portion of us to work from home. Majorly, the IT and related Companies evacuated their workplaces and permitting their employees to work from home. 

But, a significant bit of these workers aren't having appropriate data transfer capacity at home to help their day by day undertakings. Just, where we worked has changed however all the cutoff times to present our work remains the same. In this fast phased competition, Companies are running behind the time to deliver their project to their clients at the earliest. In this way, here are a couple of things that you can do to fix your WiFi speed.
How To Boost Your WiFi


How to Boost your WiFI-Tips To Boost Your Home WiFi speed


There are different ways which will help you in boosting your WiFi speed. We are going to share a couple of steps on How To Boost Your WiFi so that you can increase the speed of your home WiFi and use it with out any interruptions.

Router Away from the walls: Maintain some distance between the WiFi routers and walls as WiFi signals may experience difficulty in penetrating from the reinforced concrete walls. The wireless networks utilize radio frequencies to send and receive data, therefore wireless signals may be weak due to interference.


Avoid Wireless Devices: Remote/wireless gadgets, for example, headsets, Keyboards, and mice can interface with the Wi-Fi signals. The device that uses bluetooth switches to the frequency range of the device that uses WiFi can ruin a portion of the Wi-Fi traffic and causes delays. If the same happens so often, the loss on the WiFi signals will be high.

Router Placement: Yes, Router placement matters. If you keep the router at the correct place, you can experience the better signal performance. Keep your router away from the electrical devices or equipment which creates Radio frequency noise. Do not keep your WiFi router on the floor but try to mount as high as possible as routers spread signals towards down.

Use LAN Cable: Ethernet uses cables, it works faster than wireless devices. Accessing the internet via Ethernet will have a Signal Stability and Consistency. But, avoid using an old or cheap cable.

Router Away from the Television: Media Components like TV’s can affect the performance of the WiFi signals. Also if possible, keep it away from metal appliances like refrigerators.


Change the band: If your router supports a dual band that is with the frequencies 2.4GHz and 5GHz, you have to switch to the better band for the good network signals. Simple thing to remember is 2.4 GHz band supports Longer range but slower speed and 5 GHz band supports Higher speed but Lower range. Many devices use 2.4 GHz which have higher traffic over the channel causes the connectivity issues, whereas the 5 GHz band has 23 available channels with low traffic.

Set your router to restart or Reboot regularly: Resetting the WiFi router can fix slow internet connectivity issues. Reboot helps clearing accumulated memory or processor baggage.


Few more tips on how to boost your WiFi so that you can boost the speed of your Wi-Fi at home using Heatmap Tools to find WiFi Dead Zones and abolish Poor or Slow WiFi Speeds, Update your Wi-Fi adapter or driver, use powerline adapters etc.


I hope above tips and tricks which were shared on how to boost your WiFi helped in increasing your home WiFi speed. Please stay connected to his blog for more updated on the latest tips and ticks, Gadget released, App released, technology related news.

Internet speed is very important when you work from home to avoid the interruption and delay in delivering the duties. So, try following the above tips on how to boost your WiFi speed. Remember NO INTERNET IS BETTER THAN SLOW INTERNET

Wednesday, 25 March 2020

WhatsApp Tips And Tricks - Updated In 2020


WhatsApp Tips And Tricks : WhatsApp is the most commonly used app now a days. One of the best messaging app in the current market. The application always gets updated with different features that amaze its users.

Today we are going to share the few tips and tricks that are very helpful while using your WhatsApp app. There are so many WhatsApp secret tricks however we are going to share some WhatsApp Tips and Tricks in the following article.


Please follow the steps which were shared in order to use the complete features of the WhatsApp application. You can see plently of WhatsApp tricks online we are going to share most unique tricks of this messaging app.

 WhatsApp Tips And Tricks - Updated In 2020

WhatsApp Tips And Tricks


There are so many feature included in this application. Initially it was majory used for messaging , late on it was updated to use for Audio calling, Video calling, File transfer, Picture in picture technology to play videos with out closing the application and many more. I'd suggest you to please go through the complete article.

WhatsApp Tips And Tricks

As we mentioned there are plenty of WhatsApp Tips And Tricks however, we shortlisted some and listing below along with the steps so that you can use them while reading this article.

Mark Chats As Unread:

Yes! we can mark the chats as unread just like your emails. With this you'll be able to send replies with out forgetting. The navigation is so simple that you need to select the chat by holding on the chat and tap on top right three dots and you can find an option stating "Mark As Unread". WhatsApp's Mark As Unread option will help you to reply all the chats with out missing.

Read And Send Replies Without Touching You Phone :

You may wonder that how is it possible even without touching the phone. There are virtual assistants in our smartphones which will help us in this. Siri and Google Assistant these are the major bots that will help us in replying the messages without touching our phones.

In order to enable this feature first you need to give access to Assistant. Open the Google Assistant and say “Read my messages”. When you do this for the first time, you will see a message asking you to enable permissions. Click OK.


And you need to enable the toggle option beside Google and there will be a pop up window asking for allow or deny tap on Allow thats it. Now whenever you want to reply to any contact or want assistant to read the message you can give command and bot will do it for you


Contact Who Is Making Your Storage Full:

There are contacts who always send Media files and that makes our storage insufficient. In order to find that particular contact, there is a WhatsApp Trick please follow that to find the contact who is eating your storage space.

You just need to open the Settings on WhatsApp, navigate to Data and Storage Usage. There you can tap on Storage Usage and select the contact.

There you will be able to see the amount of storage that has been used by each contact.

WhatsApp Wallpaper Trick:

Many of us don't know how to change the WhatsApp wallpaper and very few use this feature. Just like our systems we can also change wallpaper in our chats. This feature is available for both iOS and Android please follow the below steps


iOS: Settings > Chats > Chat Wallpaper > Choose Wallpaper Library, Solid Colours or Photos.

Android: Settings > Chats > Chat Wallpaper > Choose Wallpaper Library, Solid Colours, Gallery, Default or No Wallpaper.

WhatsApp Finger Print Lock :

No more third party apps required to lock WhatsApp as the app itself came with an update an update of Finger print lock. This feature will be active in all smartphones which support fingerprint lock.

In order to activate the WhatsApp Finger Print Lock please open the WhatsApp application and tap on top right three dots > please tap on settings> tap on Account and then tap on Privacy. Scroll down you can see Finger print lock, toggle the option and now you are able to lock the WhatsApp with your finger print.

Hope above shared tips and tricks of WhatsApp helped you. Please stay connected to this blog for more latest updates on the app tricks and tips along with that we also update on latest gadget releases, technology related news.